For Galentine’s Day, KK and I attempted a genoise sponge cake. It was also her birthday weekend, so we wanted to celebrate with a simple cake. She finally purchased a scale, which allowed us to start doing more accurate baking. We found this recipe in a Facebook group called Subtle Asian Baking. Inspired by group member Michelle (IG @michelles.belly), we attempted an Earl Grey and Strawberry cake.
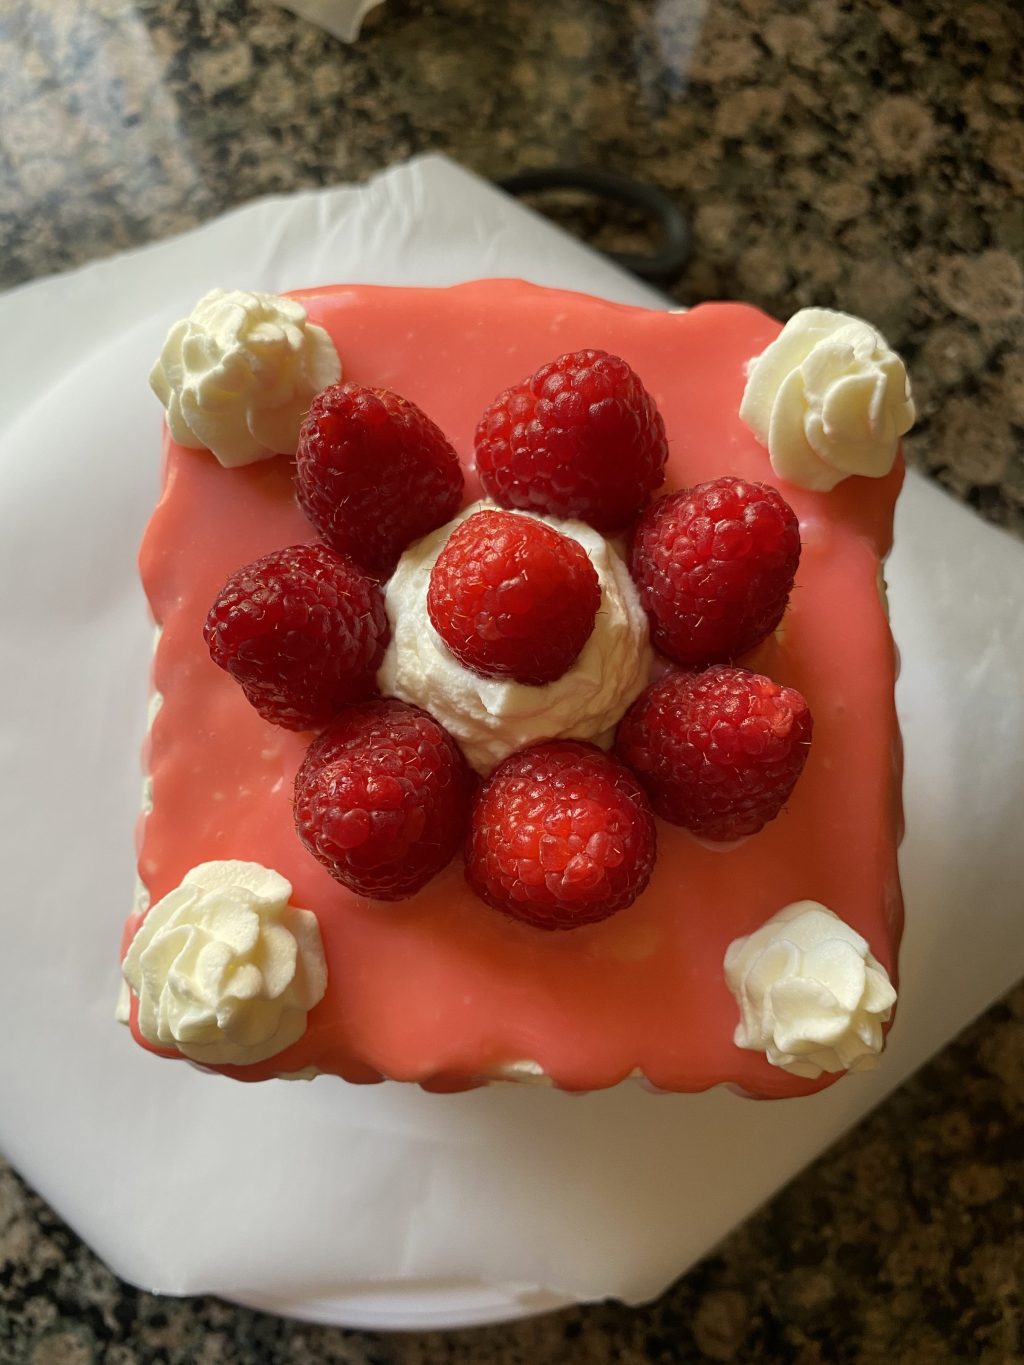
We still haven’t invested in round cake pans yet, so many of our cakes are square or rectangular. I don’t mind. There’s a little more math involved when sculpting the cake, but they usually turn out well. I used fresh raspberries instead of strawberries because the grocery store I went to was entirely out of strawberries. It worked out since I preferred the tartness of the raspberries to balance the sweetness.
This was our first time doing a genoise sponge. It was quite nerve-wracking since I tried to consciously fold the batter gently. I was pleasantly surprised by the texture since it was a bit dry on the first day but was quite tender and delicious on the 2nd day. The cake was labor-intensive but rewarding. I will use this recipe again for another occasion.

Mr. C decorated the cake using our Kootek All-in-one 52-pieces Cake Decorating Supplies. We’ve used it several times since I bought it in August. Mr. C loves using the tips and learning how to use all the available piping options. I like that the kit includes reusable silicone bags. It’s a great beginner set for anyone trying out home baking. ☆☆☆☆☆
animatolabs.com is a participant in the Amazon Services LLC Associates Program, an affiliate advertising program designed to provide a means for sites to earn advertising fees by advertising and linking to amazon.com.
Earl Grey and Strawberry Genoise Cake
Inspired by Asian bakeries, this is a lightly sweeten genoise cake sponge with hints of strawberries. Topped with fresh raspberries, this delicate cake is sweet and with a hit of tartness.
Ingredients
- Genoise Sponge
- 3 large eggs, separate yolk and whites.
- 150 g sugar – 70 g for whites, 80 g for yolks
- 10 g honey
- 3 g vanilla extract
- 30 g melted butter
- 45 g milk
- 1 earl grey tea bag
- 85 g flour
- 15 g corn starch
- raspberries for decorations Strawberry Cream Filling:
- 25 g freeze-dried strawberries
- 275 g whipping cream
- 20 g granulated sugar Whipped Cream Icing
- 250 g whipping cream
- 15 g granulated sugar Chocolate Drip
- 45 g white chocolate
- 45 g whipping cream
Directions
- Warm milk in the microwave and add the teabag to milk, steep for at least 10 minutes.
- Preheat oven to 170 C/355 F. In a large mixing bowl or stand mixer, whisk egg whites. Add sugar gradually until stiff peaks form. This may take 4-5 minutes or more.
- In another bowl, whisk egg yolks, remaining sugar, and honey until it is a pale yellow. Then whisk in vanilla extract.
- Gently fold egg whites into egg yolk.
- Sift in flour and corn starch into the batter and fold gently
- Add melted butter to your tea milk. Mix a small amount of batter into the tea milk butter mixture, then incorporate the mixture with the rest of the batter. Fold gently to combine.
- Line a loaf pan with parchment paper. Pour batter into the pan and bake for 35 min at 335 F.
- While the cake is baking, make the filling and frosting. For the Strawberry Cream filling, use a spice/coffee grinder to pulverize the freeze-dried strawberries.
- Whisk whipping cream until whipped cream is formed. Incorporate strawberry powder into the whipped cream. Place in refrigerator until cake assembly.
- Whipped the whipping cream with sugar to make the whipped cream icing. Place in refrigerator until cake assembly.
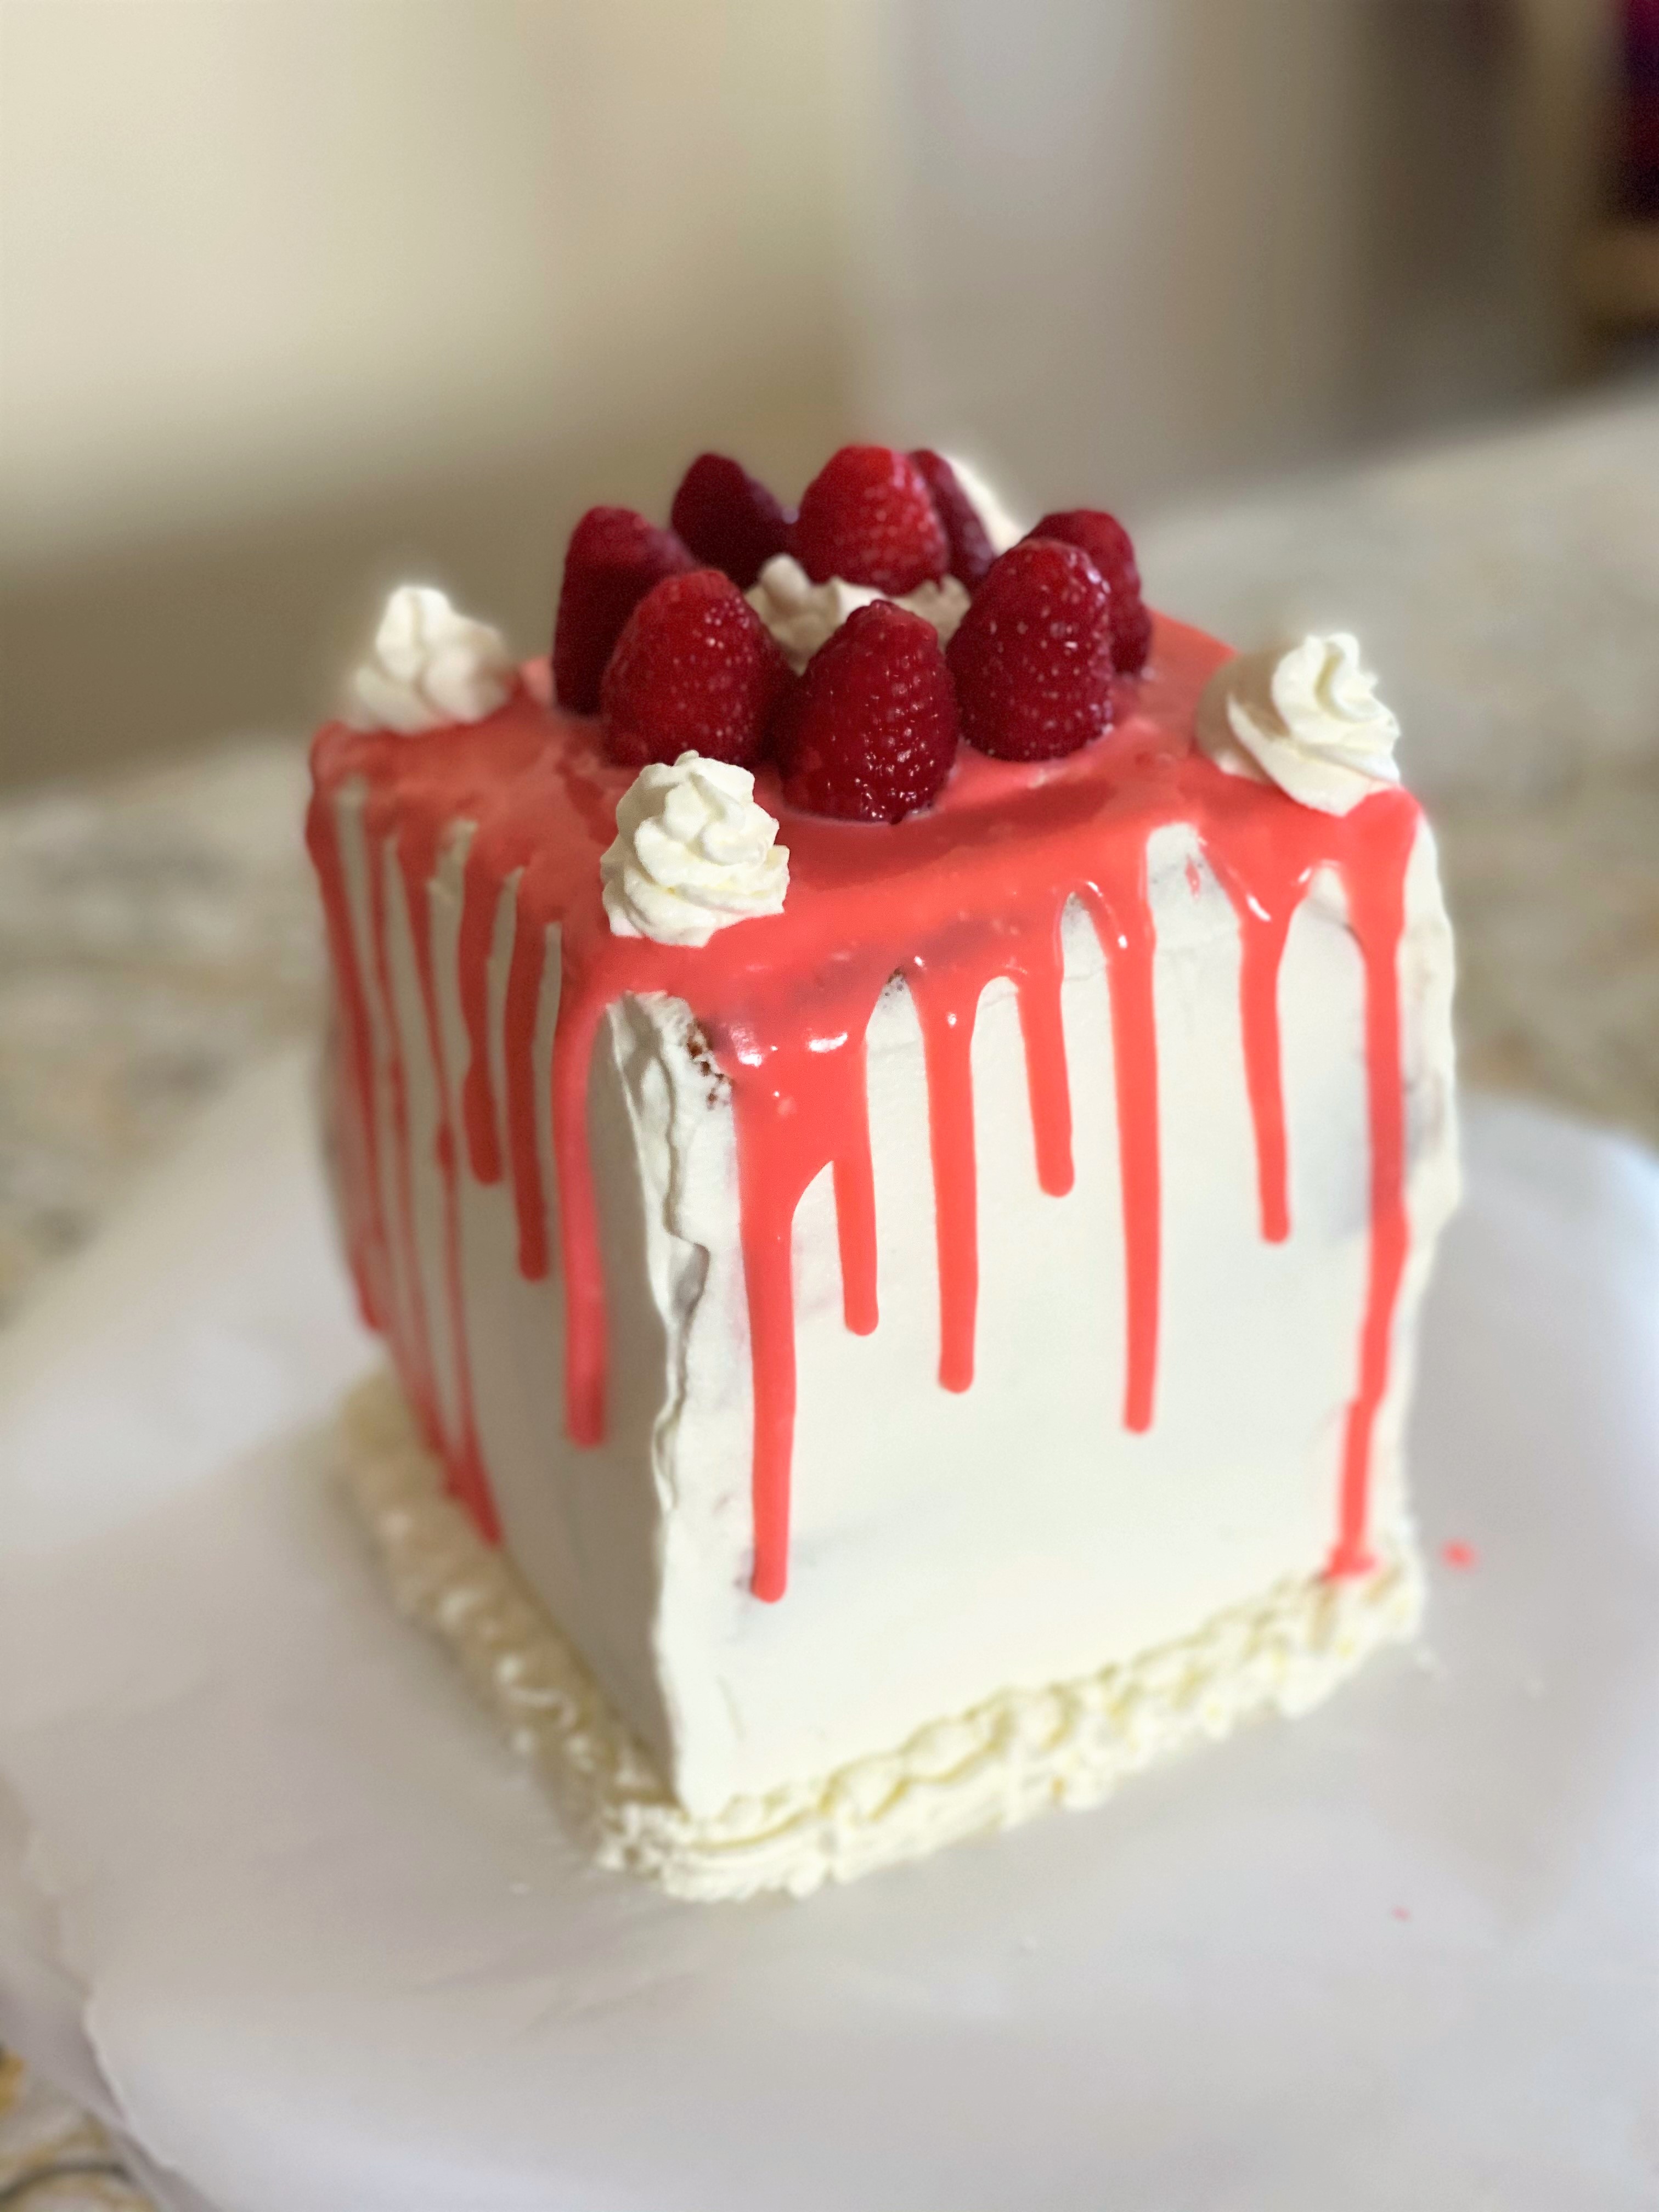
- For the Chocolate drip, microwave the whipping cream for 20 to 30 seconds. Add the white chocolate to the warm milk and stir until melted completely. Add food coloring of your choice. Allow to chocolate drip to cool a bit before cake assembly.
- When the cake is cooled, cut the loaf horizontally once and vertically once. This will give you four square pieces to stack.
- Start with a layer of cake, then strawberry cream filling, and repeat. You should have 3 thick layers of strawberry cream fillings with your 4 layers.
- Cover the cake with the whipped cream icing on the outside of your cake.
- Refrigerate the cake for a cold cake to create drips.
- Pour small amounts of chocolate along the top edge of the cake. Use a spoon to push the chocolate off the edge to create drips. Delicately cover the top of the cake with the remaining chocolate.
- Decorate the top of the cake with remaining whipped cream icing and top with raspberries.
Nutrition
Per Serving: 367 calories; 15 g fat; 53 g carbohydrates; 5 g protein; 75 g sodium; 35 g sugar.
Until next time,
Diana L.
